Wednesday, August 6, 2014

Free Tools to Delete Currently Used, Locked, Undeletable, Busy Files


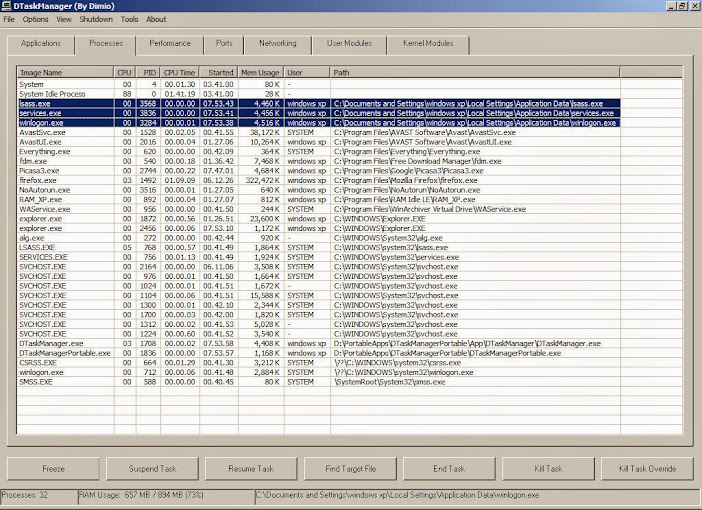
Unlocker tools are for situations where you have tried to delete, move or rename a file or folder under Windows only to receive a dialog box with an error message like "Cannot delete [filename]: It is being used by another person or program. Close any programs that might be using the file and try again." (or some other message about sharing violation or the file being in use). In some cases, closing "any programs that might be using the file" is easier said than done, since you might not be able to detect which program is locking that particular file. Sometimes the culprit is Windows Explorer, or some DLL loaded by it. The tools listed here work around this problem to delete undeleteable, locked, busy, or currently used file - some of them do this by scheduling the file to be deleted on the next reboot.

If the files are locked by Explorer you can run this at the CMD Prompt

TASKKILL /F /IM EXPLORER.EXE

Another solution is to Log-off and Log-on again on your account.

In case these two won't do the trick use this tools instead to help you delete stubborn files:

Proceed to download links:


Free Data Recovery Softwares

There are many free data recovery programs (undeleter) that can help recover your accidentally deleted or erased files. These file recovery programs can help you recover or undelete files on your PC.
Files that have deleted or recently emptied from your Recycle Bin are still present on your hard drive  or external USB drives and can be recovered using free data recovery software.

Take not that you can greatly increase the chance of recovering a file by limiting your computer usage.  For USB drives or memory cards do not use them until you are ready to do the recovery.  If you want to recover from your HDD, better use a portable software like Recuva.


Proceed to download links:

Sunday, August 3, 2014

USB Drive Protection Tools


An ounce of prevention is better than a pound of cure. Same saying can be applied to your USB External Storage Devices. It's better safe than sorry. Imagine if you had a full blown infection from an autorun file coming from your USB drive which could easily be prevented by using the following tools.


Proceed to download links

Reasons to fear your mother using the Internet


Reasons to fear your mother using the Internet

Source:

Friday, August 1, 2014

How to Remove VBS Worm Using System Explorer 


1. Launch System Explorer. Go to the Processes Tab and end all Wscript.exe processes.

2. Next go to the Autoruns Tab. Right click on the wscript.exe entry and select Open Item Key in Regedit.

3. At regedit, take note of the location of the vbs file and delete it with Explorer.

4. Back at System Explorer and Delete Item.

5. Delete all autorun.inf and vbs file located at the root directory of all drives.

6. Do a scan of your hard drive as well as your external drives. I suggest Malwarebytes.

Thursday, July 31, 2014

Managing Risk


Advanced Techniques


The guidance in IT Pro Advanced Techniques helps IT professionals investigate, analyze, and—when possible—remove malware from an infected computer. This guidance, intended for advanced users, helps IT professionals understand the impact of malware and create a rudimentary roadmap for cleaning infected computers. In addition, this effort provides the user more information about the internal operation of malware.

The guidance involves the use of several Windows Sysinternals tools, a suite of advanced diagnostics and troubleshooting utilities for the Windows platform available for download at no charge from the Microsoft Download Center.


Source:  http://www.microsoft.com/security/sir/strategy/default.aspx#!malwarecleaning

Friday, July 18, 2014

Uninstallers (removal tools) for common Windows antivirus software

Uninstalling antivirus software on a PC is sometimes is not easy.  The need for AV uninstallers arises if the default uninstallation fails. Such could generate errors that will not allow installation of a new AV.

Avasthttp://www.avast.com/uninstall-utility
AVGhttp://www.avg.com/us-en/utilities
Avirahttp://www.avira.com/en/support-for-free-knowledgebase-detail/kbid/88


B
BitDefenderhttp://kb.bitdefender.com/site/article/333/
BullGuardhttp://www.bullguard.com/support/product-guides/bullguard-internet-security-guides-12/getting-started/uninstalling-bullguard.aspx


C
CA Antivirussee Total Defense Anti-Virus
Comodo Internet Securityhttps://support.comodo.com/index.php?_m=knowledgebase&_a=viewarticle&kbarticleid=298
CounterSpyhttp://www.google.com/#q=counterspy+uninstall
Cyber Defender Early Detection Centerhttp://www.ustechsupport.com/faq.html#q4


D
Dr. Webhttps://support.drweb.com/support_wizard/?lng=en
(Only registered Dr. Web users can access support content)


E
eScanhttp://www.microworldsystems.com/download/tools/esremove.exe
ESEThttp://kb.eset.com/esetkb/index?page=content&id=SOLN2788


F
FRISK F-PROT Antivirus for Windowshttp://www.f-prot.com/support/windows/fpwin_faq/25.html
F-Secure


G
G Datahttps://www.gdatasoftware.co.uk/?eID=PushFile&dl=f4b2f2fd23%3AAFEIBgU%3D


K
Kasperskyhttp://support.kaspersky.com/common/service.aspx?el=1464
K7 Total Securityhttp://www.k7computing.com/en/tools/K7RT.exe


L
LavaSofthttp://www.lavasoftsupport.com/index.php?showtopic=28


M
Malwarebyteshttp://www.malwarebytes.org/mbam-clean.exe
McAfeehttp://download.mcafee.com/products/licensed/cust_support_patches/MCPR.exe
Microsoft Security Essentialshttp://support.microsoft.com/kb/2435760


N
Norman Virus Control/Norman Security Suitehttp://www.norman.com/support/support_issue_archive/67798/en
Norton(Symantec)ftp://ftp.symantec.com/public/english_us_canada/removal_tools/Norton_Removal_Tool.exe
Norton Security Scan
ftp://ftp.symantec.com/public/english_us_canada/removal_tools/NSSRT.exe


P
Pandahttp://www.pandasecurity.com/resources/sop/UNINSTALLER_08.exe
Panda Cloud Internet Protectionhttp://www.pandasecurity.com/resources/sop/Cloud_AV_Uninstaller.exe
Pareto Logichttp://www.paretologic.com/resources/help/xoftspyse/195.htm


S
Sophoshttp://www.sophos.com/support/knowledgebase/article/11019.html
Spybot Search & Destroyhttp://www.safer-networking.org/faq/how-to-uninstall-2/


T
Total Defense Anti-Virus (formerly CA Anti-Virus) http://totaldefense.iyogi.com/?p=368
Trend Microhttp://esupport.trendmicro.com/solution/en-us/1056551.aspx
Trend Micro Titaniumhttp://esupport.trendmicro.com/solution/en-us/1059018.aspx
Trend Micro Worry-Free Business Security Agenthttp://esupport.trendmicro.com/solution/en-us/1057237.aspx


V
Vipre (Sunbelt Software)http://kb.threattracksecurity.com/articles/SkyNet_Article/How-to-Uninstall-VIPRE-Antivirus-and-VIPRE-Internet-Security


W
Webroothttp://support.webroot.com/cgi-bin/webroot.cfg/php/enduser/std_adp.php?p_faqid=1761
Windows Defenderhttp://kb.eset.com/esetkb/index?page=content&id=SOLN2390
Windows Live OneCarehttp://download.microsoft.com/download/4/c/b/4cb845e7-1076-437b-852a-7842a8ab13c8/OneCareCleanUp.exe
Windows Security Essentialshttp://support.microsoft.com/kb/2435760


Z
Zone Alarmhttp://download.zonealarm.com/bin/free/support/download/clean.exe


Saturday, July 12, 2014

How to remove Smart Guard Protection Part 2

How to remove Smart Guard Protection Part 1


Here is another way to disable and remove this fake antivirus

Copy Task Manager to Windows folder and rename it as CMD.exe


Launch the renamed file and terminate the fake AV process.  Smart Guard Protection will not block CMD.exe.  You can also copy File Assassin or any program to the Windows folder and rename it to trick Smart Guard Protection.


Now that the fake AV is no longer running in the background, we can start deleting the files and registry entry to prevent it from starting with Windows again

On your Desktop right click on Smart Guard Protection icon and click Properties.  Click the Find Target... button.  This will launch explorer to the location of the fake AV file.  Delete the entire folder.


Launch regedit and navigate to

HKCU\Software\Microsoft\Windows\CurrentVersion\RunOnce

Delete the value AS2014 


Alternative:  If you have CCleaner, launch it and go to Tools | Startup and delete AS2014


Scan your computer with MBAM to reverse the changes made by Smart Guard Protection.  Here is the result of the scan.

Registry Values: 1
Hijack.SecurityCenter, HKU\S-1-5-21-746137067-1078145449-682003330-1003-{ED1FC765-E35E-4C3D-BF15-2C2B11260CE4}-0\CONTROL PANEL\DON'T LOAD|wscui.cpl, No, Quarantined, [e5be7d215d1e4ee8d3e93b1110f303fd]

Registry Data: 3
PUM.Disabled.SecurityCenter, HKLM\SOFTWARE\MICROSOFT\SECURITY CENTER|AntiVirusDisableNotify, 1, Good: (0), Bad: (1),Replaced,[5350ccd2b1ca8fa79b556c2b8d7713ed]
PUM.Disabled.SecurityCenter, HKLM\SOFTWARE\MICROSOFT\SECURITY CENTER|FirewallDisableNotify, 1, Good: (0), Bad: (1),Replaced,[6c375648b5c6d462f1003661e71d04fc]
PUM.Disabled.SecurityCenter, HKLM\SOFTWARE\MICROSOFT\SECURITY CENTER|UpdatesDisableNotify, 1, Good: (0), Bad: (1),Replaced,[a8fb1886037811256f836433aa5ac63a]


Wednesday, July 9, 2014

How to remove Smart Guard Protection

Smart Guard Protect (Fake Antivirus)

Performing a bogus scan.


After the scan it shows the threats found.


If you click Repair All, it will show this screen.


After clicking Buy Full Edition you get this.  At this stage, don't get scared and never spend a dime on it.


While it is active and you want to launch for example taskman, you'll get this warning screen.  With the exception of explorer, mspaint and cmd anything else you run gives a warning.


Analysis

Values added

HKU\S-1-5-21-746137067-1078145449-682003330-1003\Software\Microsoft\Windows\CurrentVersion\RunOnce\AS2014: "C:\Documents and Settings\All Users\Application Data\d9ngVr33\d9ngVr33.exe"

Files Added

C:\Documents and Settings\All Users\Application Data\d9ngVr33\d9ngVr33.exe
C:\Documents and Settings\All Users\Application Data\d9ngVr33\d9ngVr33.exe.manifest
C:\Documents and Settings\All Users\Application Data\d9ngVr33\d9ngVr33.ico
C:\Documents and Settings\All Users\Application Data\d9ngVr33\d9ngVr33aQDsaggg.in
C:\Documents and Settings\All Users\Application Data\d9ngVr33\d9ngVr33aQDsaggg.lg


Folder added

C:\Documents and Settings\All Users\Application Data\d9ngVr33


Virustotal Scan
 

Removal 

Since CMD is not disabled we will be using it kill the Fake AV's process.  Launch CMD and run the following commands

TASKLIST 


Take note of the RandomName.exe on the list 

TASKKILL /F /IM snUa339g.exe


We can use explorer and regedit to remove Smart Guard Protection

Launch regedit.  Navigate to 

HKCU\Software\Microsoft\Windows\CurrentVersion\RunOnce

and delete the entry.  Take note of the path of snUa339g.exe


Launch explorer and navigate to the path of snUa339g.exe and delete the folder.


Run an updated MBAM to finish the cleaning process


Note:  This is just a quick analysis.  I'll update in case there are other registry keys that I've missed.

Tuesday, June 24, 2014

kpcgrhynko.vbs Analysis and Removal


Analysis


Virustotal scan

SHA256: f7dacc9caf962fde36c35608ecfd8a1a591185d89f9584574f158795b6ae29c0
File name: COOL.vbs

Keys added:1
HKLM\SOFTWARE\kpcgrhynko

Values added:2
HKLM\SOFTWARE\Microsoft\Windows\CurrentVersion\Run\kpcgrhynko: "wscript.exe 
//B "C:\Documents and Settings\user\Application Data\kpcgrhynko.vbs""
HKLM\SOFTWARE\kpcgrhynko\: "false - 6/25/2014"

Files added:4
C:\Documents and Settings\user\Application Data\kpcgrhynko.vbs
C:\Documents and Settings\user\Start Menu\Programs\Startup\kpcgrhynko.vbs

D:\autorun.inf
D:\
kpcgrhynko.vbs

Removal

  • Terminate wscript.exe process

  • Remove the kpcgrhynko.vbs entries from Startup using CCleaner.  Take note of the path of the worm.  Highlight them and click the Delete button. 


  • Delete all occurences of kpcgrhynko.vbs including all autorun.inf in all drives.
  • Delete HKLM\SOFTWARE\kpcgrhynko with Regedit
  • Using fix.reg to remove registry entries.  Copy/Paste the following to Notepad and save as fix.reg.  Double click on this file or right-click and Merge to Registry.

REGEDIT4

[-HKEY_LOCAL_MACHINE\SOFTWARE\kpcgrhynko]

[HKEY_LOCAL_MACHINE\SOFTWARE\Microsoft\Windows\CurrentVersion\Run]
"kpcgrhynko"=-


  • Scan with an updated Antivirus.


Friday, May 30, 2014

How to use Runscanner

Scanning

Download Runscanner here

Launch the program

Select Expert Mode and click Ok


2laufra.jpg


Click Scan Computer

2ujnyb6.jpg

Wait for the scan to finish then click Save Run File

1053z2g.jpg

Upload the saved run file and post the download link

I will upload runscanner_fix.run which will contain the fixes

Download and save on your Desktop


Removal

Launch Runscanner

Click Open Run File and select runscanner_fix.run

30nckdg.jpg

Click on Item Fixer then Fix Selected Items

2n67pzm.jpg

Reboot

Try doing a full scan with your updated antivirus or with MBAM.
Scanning Download Runscanner here Launch the program Select Expert Mode and click Ok 2laufra.jpg Click Scan Computer 2ujnyb6.jpg Wait for the scan to finish then click Save Run File 1053z2g.jpg Upload the saved run file and post the download link I will upload runscanner_fix.run which will contain the fixes Download and save on your Desktop Removal Launch Runscanner Click Open Run File and select runscanner_fix.run 30nckdg.jpg Click on Item Fixer then Fix Selected Items 2n67pzm.jpg Reboot Try doing a full scan with your updated antivirus or with MBAM.

Read more at: http://www.forum.pct.ph/topic/215-how-to-use-runscanner/?p=432
Copyright © Pinoy Computer Tech.

Thursday, May 22, 2014

How to remove Brontok in under 5 minutes Part 2

Preliminaries

Install the two programs mentioned in the first part of How to remove Brontok in under 5 minutes.  Update Malware Destroyer.
Now for the step by step Brontok manual removal instructions:

Killing the Process
  • Launch DTaskManager
  • Select Processes tab and sort the list by Path
  • Select lsass.exe, services.exe and winlogon.exe (location %APPDATA%)
  • Click End Task button

DTaskManager+%2528By+Dimio%2529.jpg


That's it, we've disabled Brontok in under a minute.

Removal of files by scanning

  • Launch Malware Destroyer,
  • Select Scan Now on the drop down menu

eO1zSe9_0Qtxx0QystkN-_k3TIMCff3E7bo1Ld07

  • Close the next dialog
  • Click Execute tab

Detected+Malware+from+Last+Scan.jpg


Now we've disabled and eliminated Brontok on your system in under 5 minutes.

If you have CCleaner, launch it and go to Tools | Startups and delete all Brontok startup entries in case we've missed something.

CCleaner+Brontok.jpg


Time to do a Full Scan of your system.  I suggest you use Malwarebytes.

For the removal of the other infected files in your external HDD you can perform a scan right away or wait for the third part of the tutorial.  We'll be using Explorer to remove the remaining Brontok worms plus I'll teach a quick method of deletion for Windows XP users.

How to remove Brontok in under 5 minutes Part 1